I was giving some thought to what I could follow up my post titled What to Get as a First DSLR. I also wanted to make a statement about something that many photographers will disagree with me on: “It’s OK to use Auto modes”. This includes ‘AUTO’ and the various preset Scene modes.
There! I said it! Whew!
I wanted to present a ‘first’, or ‘baby steps’ introduction into the world of DSLR photography. It can be a bit intimidating for anyone just picking up their first DSLR. I mean, honestly, when I got my first DSLR I thought, “Awesome! This is so cool! I’m so excited! …umm …now what?”
For the purpose of this post, I am assuming you are using a DSLR or another camera with a dial with the cute little icons for different scenes. I’m also assuming that you are new to photography with a DSLR.
Also, be aware that I am by no means a professional photographer and that I am only expressing my opinions based on my own and my family’s experiences.
About Naysayers
Forget the ‘elitists‘ who tend to say that they “always shoot manual mode”. These folks are either closet masochists or they have been shooting for so long that they can get it right each and every time. If they can get it right every time, odds are that they learned on film cameras and they undoubtedly have the battle scars from learning.
Me? I’m neither. I don’t get it right every time. I use what I think is appropriate at the time.
OK, so back to Auto Modes…
What are They and Why?
These are exposure modes that you can select that will essentially do the work for you in selecting what the camera determines to be the correct settings for taking photographs.
They exist so that we can start making images right away and be able to make these images based on the expected subject or conditions. They also exist for those who just don’t know what exposure settings are required for a given condition. In other words, you don’t need to be an experienced photographer to use them. Just select the mode and shoot. That’s it. That’s all.
They are there for a reason. I still use them myself from time to time either because I want a decent shot right away without worrying about the settings or simply to compare against what I have chosen myself.
Where are They?
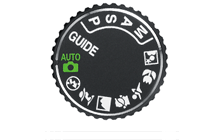
If you take a look at the top of your camera, you will find the Mode selector dial that looks much like the image above. We will separate these into two categories: Auto Modes and Scene Modes.
Auto Modes
Auto Modes are pretty much basic all-round selections that handle most types of scenes in a generic kind of way. Starting out, they are probably what you will depend on the most. We have two of these: ‘Full Auto’ and ‘Auto Flash Off’.
Full Auto

This is the mode where everything is determined by the camera. Completely automatic photography. The camera tries to decide which is the best combination of exposure settings for the image by analyzing the scene for the best results. If the camera determines that there is not enough light, the flash will automatically pop up.
Usually we have selected ‘AUTO’ right after we unpacked and charged our camera and are itching to start taking pictures. As long as your images are turning out well, keep using it for now.
Use this for: Mostly anything when starting out.
Auto Flash Off

This is the same as Full Auto except the the flash is disabled. This s useful in situations where there is plenty of light and you really don’t want the flash to pop up. If you think that a flash is required you can pop up the flash with the flash button, right to the left and front of the flash.
Sometimes, you may be in a situation where using a flash is undesirable but you still haven’t mastered the exposure settings. These are times for this selection.
Use this for: When you don’t want to use your pop-up flash.
Scene Modes
Sometimes, while Auto modes are great in many situations, they just won’t cut it as well for others – especially if you are looking to get better images from your camera as a beginner. Scene modes are a good starting point in learning to use your DSLR. These are more specialized automatic modes for distinct situations or settings.
I have assembled a brief description of some of these for you. Hopefully they can start you on your way to learning to use your DSLR. Depending on your DSLR, you may have more scene modes than are listed here. Your camera’s manual should hopefully have descriptions of them.
Portrait

This is intended to create flattering portraits with softly focused backgrounds.
In Portrait mode, the camera select a large aperture (opening) for a shallow depth of field in order to isolate the subject from the background. It will use the camera’s flash to fill in the shadows. The camera will also select the focus area containing the closest subject automatically and the image will be optimized for soft, natural-looking skin tones.
Use this for: Taking photos of people in good light.
Child

This is pretty much the same as Portrait with more vivid colours for clothing and other objects.
The Child mode is good for taking snapshots of children. It can be seen as a blend between Portrait and Sports. The camera will use a fast shutter speed in an attempt to freeze movement. The camera selects the focus area containing the closest subject. Clothing and background details are vivid while skin tones are given a soft, natural finish.
Use this for: Taking snapshots of children
Sports

In the Sports mode, the camera will select a faster shutter speed to capture moving objects without blur. It will (if necessary) increase the ISO and set a large aperture in order have the fastest shutter speed as the ambient light allows in order to freeze motion.
The camera will also focus continuously while the shutter-release button is pressed halfway, tracking the subject in the center focus area. If the subject leaves the center focus area, the camera will continue to focus based on information from the other focus areas. The built-in flash is automatically turned off in Sports mode
Use this for: Taking shots of sports or other moving subjects.
Night Portrait

In Night Portrait mode, the camera will use flash to light up the main subject, and also use a long shutter time to create a natural balance between the main subject and the background lit by ambient light. The camera selects the focus area containing the closest subject.
You need to be careful when using night portrait mode. You will certainly get some blur from the background if you don’t hold the camera absolutely still. Using a tripod is recommended.
Use this for: Taking portraits in low light.
Landscape

Landscape mode is designed to keep both near and distant subjects in sharp focus. This mode uses a small aperture for increased depth of field. It is useful for general scenic travel photography, for taking a large group of people, and even some general purpose picture taking.
In this mode the camera selects the focus area containing the closest subject. The built-in flash is turned off automatically. The image will be optimized for vivid and more saturated colours.
Use this for: Taking photos of landscapes or anything else in good light where you want everything in focus.
Close Up

The Close Up mode is for producing softly focused backgrounds suitable for close-ups of flowers and other static subjects. This mode will make the camera focus on the subject in the center focus area and larger aperture for maximum depth of field.
The close-up mode on your DSLR will not allow you focus closer than the lens allows but can still produce a nice effect. Use of a tripod is recommended to prevent blur.
Use this for: Taking close-up shots of flowers and other small subjects.
What Next?
As an introduction to DSLR photography, I would recommend that you use every opportunity that you can to use these Auto Modes and Scene Modes. See how they work and try different modes for different types of shots. Compare how one mode differs from another and use them in creative ways.
Remember, Auto modes are not just for beginners. They can be used by photographers at all levels. Sometimes, in fact, it’s just easier to dial in a mode and then shoot. Easy-peasy!

I’ve been into photography all my life and usually can be seen running around with manual cameras hanging around my neck or my phone aimed at various things. Exposures are precise and complicated, at times. It’s nice to be able to trust your camera to have your back in this area and just focus on your perspectives. Photography is an art and anyone who has ever seen abstract paintings in a gallery can attest, there’s no real way to mess it up as long as it’s yours. I welcome newbies into my hobby! Whatever gets you out there sharing the way you see the world is okay in my book. Professional photographers get paid to be snobs. That’s not a world I have to live in simply because I like capturing moments. Great post.
LikeLiked by 1 person
The designers have created these modes to do specific things so there is no reason not to use them if you like the results!
I tend to use the AV and TV modes mostly but have been known to take some quick shots in auto
LikeLiked by 1 person
Thanks for sharing. I’m pretty new to photography and honestly have found the best practice is just to keep the cam on auto and practice my angles and shot selection. Why master the palate when I can’t even draw the fence? (Or so I would say…)
LikeLiked by 1 person
Thanks for the comment. Great analogy too!
LikeLike
I find auto mode so, so useful when I am concentrating on something else. For example, when I’m hiking, I don’t want to be left too far behind my husband/hiking partners so it is soooo much quicker to adjust to the lighting and various conditions by relying on auto settings. That way I can keep walking and still take photos.
I’ll switch to manual when I have more time.
LikeLiked by 1 person